3 Positives:
bumbled but made some progress
self-care
a pretty good night’s sleep
3 Positives:
bumbled but made some progress
self-care
a pretty good night’s sleep

3 Positives:
the Primary program at church yesterday
an idea coming to “life” at midnight
peace in knowing the process of change in leadership at church

3 Positives:
a little play time in the studio is a good thing
read a little
checked off a few things on the longer to-do list
My Journey Notes:
Last week’s eye surprise for T means additional changes in how things move forward. We rolled out the first of the changes last week and those will continue at least until after the first of the year. He did get a nice walk in yesterday and nearly completed his goal of steps for the day. I have a feeling some of our long term plans are also about to change — so trying to figure out how to adapt to those as well as keep things moving in as positive a way as we can. The lists just got a little longer!
3 Positives:
There’s help for T’s eyes – surgeries scheduled for November and December. Recovery time is short, but healing will take up to 6 to 8 weeks.
20 pints of salsa on the counter
dinner out – and the gift certificate we had covered all 3 meals.
How quickly September has flown by. The leaves are beginning to turn colors and fall has officially arrived. We’ve enjoyed cool mornings and pleasant afternoons and evenings.
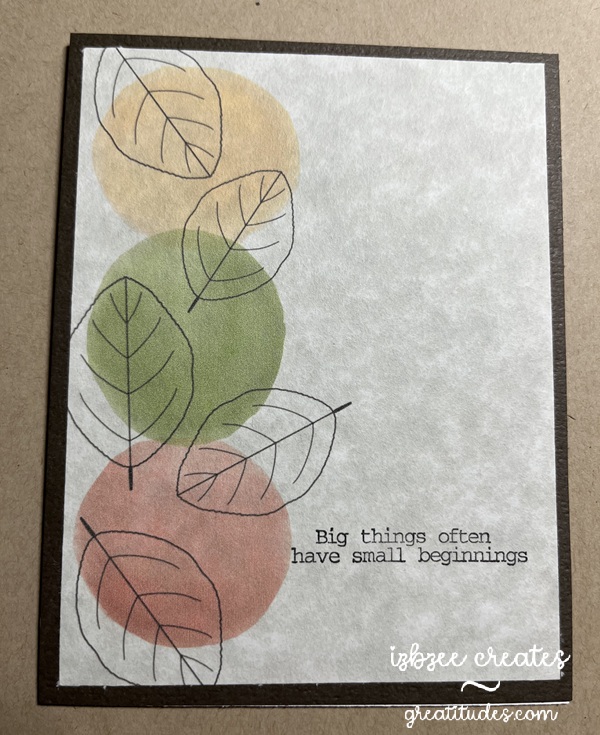
It’s also been fun to create cards using old and new techniques that will be delivered the first part of the month. This first card is the October ministering card. I saw a similar idea on Pinterest — but put my own twist on it using Procreate to “paint” the image using some of the techniques I’ve learned in a couple of online classes. The leaves are a brush from Sandra Createinspain. There were lots to choose from in a recent online offering. The sentiment stamp was found in a collection from Fun Stampers Journey (retired). Using my stamp jig made it very easy to add the sentiment on each card front after printing the main image.
We have two birthdays at the beginning of the month. Mother and daughter. I had a difficult time choosing the designs, but I think ultimately, these will work just fine for them this year. The first card is print to cut — I used Impact font, filling each of the letters with a patterned paper from Creative Fabrica. Each letter is backed with a cut in black paper set slightly to one side to create a shadow. Birthday script is done in Edwardian Script and all pieces are printed using the SCAL software’s Print 2 Cut process. The dry embossed piece is distressed and adhered to a regular A2 card base. The embossing folder is from Fun Stampers Journey (retired). I love using some of my older products! It can be used either vertically or horizontally as used in this card.

Maybe in next iterations, I’ll add some additional inking for a little more texture and depth.
The last card for this post was designed in SCAL 6 – using basic shapes from the library. The flowers and leaves are printed in a base color with additional depth and details added using colored pencils and an embossing tool. The label was created using basic shapes — a rectangle and oval and then using the Mirror Symmetry command under the Effects tab to create the shape – I added some additional details using a Winsor Newton .01 gray pen, a background stamp (Stampin’ Up! retired), and inking the edges after some distressing using an emory board to achieve the desired look. The Happy Birthday banner has been shaped a bit and glued in place before adhering the piece to the panel that was embossed using a Provo Craft embossing folder — another item from the cupboard. I really enjoyed seeing this one come to life — adding additional color to each flower and leaf was a great way to add som more depth and the embossing tool added the texture that made a lot of difference in how the light impacts the design.

As always, the Skycut performed well and each print 2 cut design was spot on! I’ve had the machine for over 4 years and haven’t had to make any additional adjustments to the calibration after the initial set up for my machine!
I saw something similar a few weeks ago on Pinterest and thought I would try my hand at doing something like it for my final tag in this challenge.

I drew and colored the bat in Procreate. After saving it as a png, I was able to do a little final editing in Photopea (an online photo editing program-free) before importing into SCAL. I did hand cut the white portion of the eyes so I could put a small piece of vellum behind that now open space with the goal of adding lights* to the tag.
For the remaining pieces of this tag, I used basic shapes from the SCAL library and added some fun papers using the Pattern command option. It’s so much fun to play with. The papers are from Echo Park (I Love Halloween Mega Collection). Everything in this matting was set to print 2 cut and the easy step by step process works magically each and every time! I added some inking to add a little more interest and texture before putting the tag together.

*The light is from Pear Blossom Press. I used the EZ-Light version. It’s an all in one unit with 3 lights each and the packaging also includes the batteries. The word PRESS is a stamp from TLC Designs. They’re perfect for interactive cards as well as indicating where the ‘button’ is on a light up card or tag.
These tags and several others can be found on our Facebook page: https://www.facebook.com/groups/eclipsecal
We have some amazing artists on the page and since I’m writing this a little early — my hopes are that we’ll have several of them participating again this year!

3 Positives:
fresh veggies — yummy
the smell of baking bread filling the house
a happy sort of day
This tag combines creating some shapes in SCAL, using some older tools and materials as well as some digital paper from Echo Park.

The crow and cup are made using and combining some basic shapes, detailing with a pen and some Wink of Stella. The cup is heat embossed using a long retired Stampin’ Up! stamp circa 2005 (Fun Filled). Then the color is added to the cup base and handle. Facial features are water colored and popped up with some foam tape – the piece behind the crow and cup is a print 2 cut element that is also splattered with a little bit of color and a water brush. It was fun using the line found in the SCAL library and duplicating it to fill in the row. Save as a group – then you can easily duplicate and center each of the groups as needed around the edge of the rectangle.
The back piece is a simple rectangle filled with some digital paper with some eyelets added in each of the four corners. That Silent Setter came in very handy again for the small eyelets!
As a final touch, a cute little sentiment strip to finish things off after placement on the kraft gift bag.

3 Positives:
a bit of fun in the studio and 5 of 12 Halloween ornaments completed
sourdough is ready for lamination and final rise
Have decided on the family gift for this year’s Christmas
My Journey Notes:
Need to redraft a bit on the regular routine and lists. Hopefully, the tweaking will help a bit in staying on top of some “neglected” chores. LOL Drafted the rest of the household to help last week and that has made a difference this week. More of the same this weekend! 🙂
It’s that time of the year again… the weather is changing, it’s football season and it’s finally getting cool again. I love Fall! Lots of good memories – leaves changing colors, bon fires, s’mores, hot chocolate and soup weather! And creating some fun tags of the season.
This year, I’m trying some new to me stuff including making sketches, using SCAL and some other software to design some elements as well as use tools and other stuff that haven’t seen the light of day for a while. This tag involves pulling a few things from the drawers and cupboards! I’ll bet you’ll be able to recognize a few of them!

Stamps (Stampin’ UP! retired), embossing powder (heat embossing), embossing folder (Cuttlebug, retired), inks and of course digital images from Sandra Createinspain. And to finish, some Mod Podge for a little shine and a bit of ribbon make up this tag.
