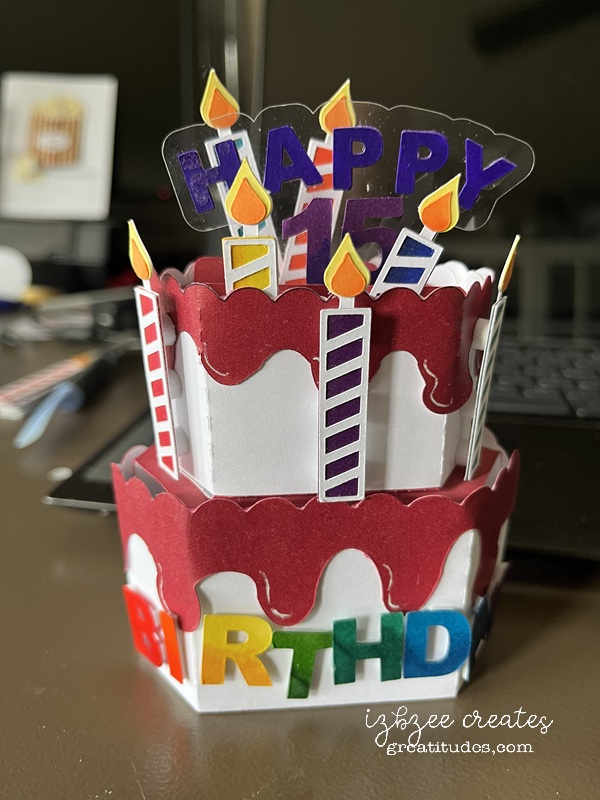
This pop up was a fun make — proved challenging at times, but overall, worked out as planned. Based on a Pinterest inspo and made using a go-to file from Simply Crafty SVGs. You can find the Valentine Gnome box card file on Creative Fabrica.
I changed the wrap around piece to a straight across piece and added a half circle edging across the top in SCAL 6. Once that piece was finalized, I copied that piece and then cut the bottom third off and added some small ovals using back minus front and union. Then made a few adjustments using the node tool to finish the icing for the cake. Remove the scoring lines from the icing piece. You won’t need them or the tab on the end. You can use the knife tool to remove it or leave it and use some scissors after cutting to take it.
The inside part of the box weren’t altered. No inserts were used on the bottom tier — and the cutouts don’t alter the support as the base and can’t be seen when the 2nd tier is glued in place.
The inserts were adapted by cutting off the pieces that would have supported the elements used in the original design. You can glue the candles to the tabs and the transparency has a long enough insert that it can be secured with some double sided tape and you don’t need to cut that tab/insert unless you want to.
A blocky font was selected for the HAPPY and BIRTHDAY. He turns 15 this year and so we added that as well. All lettering and the candles were cut in white and then colored with markers. A bit of Mod Podge was brushed across the top of each letter and number for a little more gloss.
Just a note: A previous test of the design was done in cardstock. The red cardstock was just a little too heavy and didn’t adapt to the folding/training as well as I’d hoped. However, after another 24 hours of training, it’s holding much better, but being the impatient sole I am, I did a print and cut version in a slightly lighter weight and had better luck there almost immediately. The version shown above is the print and cut version.
The base tier is cut at 100% and the second tier is cut at 85%. Both tiers can be cut using a single 8.5 x 11 sheet if you’re doing a single color base — white on white or pink on pink, etc. The candles and lettering/numbers can be cut on a single sheet as well. Alcohol markers were used for colors and some inking along the edges of the inserts, icing and inside box were also done to add a little more depth to the cakes.
Assemble using the video as a guide. Do not put the wrap or icing on the botton tier until you’ve glued the 2nd tier to the base. While the bottom tier is standing, apply glue to the base of the second tier also open and standing. Center on the top of the base and once the glue has had a few seconds to grab hold, fold the base to flatten. Place a weight on top and allow the glue to dry. You may need to retrain the pop up a bit, but it should open and shut as designed. Now add the wrap and the icing and any additional elements that you have chosen to add to your design to the base.
If you use pop up dots, you’ll need a boxy envelope. This is added postage if you send it through the mail system. But we’re offering hand delivery on this one. 🙂
Have an awesome day — hoping it’s a crafty and creative one for you.