vinyl

A fun idea

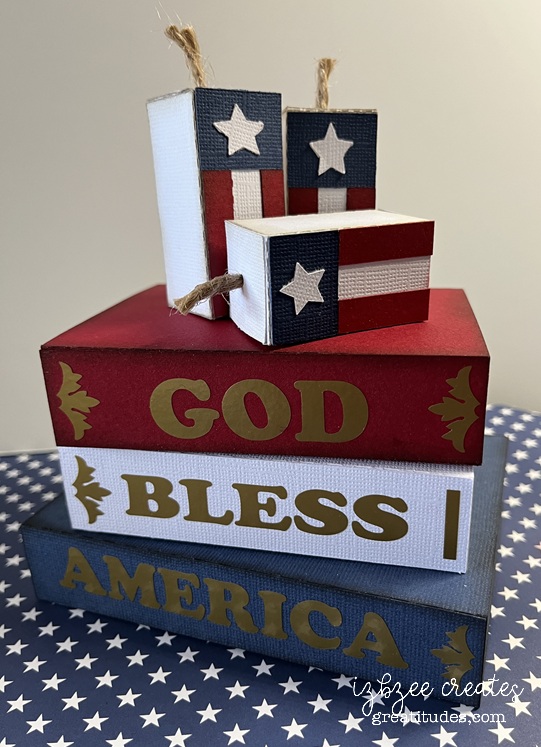
I have to admit, this wasn’t my first vision of this project, but I think this one turned out pretty good. Using the Halloween Books and Square Birthday Candle Box files from Simply Crafty SVGs – this decor piece was easy to put together and finish in a matter or a few hours after cutting. I think the cutting took longer since I was having issues with a blade and a new mat. They didn’t like each other, but that story is for another time.

The firecrackers/candles were easy to do. I did start by modifying the file and resized the main file pieces by 50%. The front panel is a combination of rectangles created using the SCAL software. All but the star is inked. Following the directions for assembly in the file, these are very easy to put together. To adjust for the other two, lengthening the box file (no changes in the width) and bottom pieces is pretty easy. There’s about an additional inch added to the middle cracker and another 1/4 inch added to the tallest. You will have to adapt the upper flap as it is too long to fit. Add another score line where the new fold should be. You can certainly glue this together after inserting the wick which is a piece of jute wrapping.

The books are cut using the file as is. I created another spine piece for each of the books — using the shadow layer feature in SCAL. Easy to do, just make sure you use the blackout box and the shadow is 0.00 – so it’s exactly the same size. There are other ways to do it, but this is just easy as well. Choose the words and font/s you want to use and create them in the software — leaving a small space at each end of the panel. Using some small rectangles or flourishes, place those to finish the spine as desired. The book paper panels are scored using a scoreboard and bone folder every 1/8 inch and inked.

Assembly videos can be found on Sandy’s YouTube channel.
Square Birthday Candles
Halloween Books

For this project you’ll need:
12 x 12 cardstock (red, white blue, off white)
gold vinyl (permanent)
glue
jute
ink (red, lt brown, black, dk blue, lt grey)
score board, bone folder
closure (optional)

Hoping you’ll have some fun doing some of your favorite creative hobbies. Enjoy the time and nurture your heart as well.

a little more Halloween fun!

It's been a fun week in the studio.  I've enjoyed nearly every minute and even learned a new technique along the way that I've been able to incorporate into the projects I've been working on.  

Check out these cuties:  The original file is from Simply Crafty SVGs and is called the 3D Round Ornament Gift Box.  You'll find it here… all adaptations are mine and are not included with the original file.  when completed the boxes do not open.  

The pumpkin …

Punkin

has some additions after making as shown in the video on Sandy's site.  I inked the ornament heavily and then glued the two halves together. 

This box will not open and is for decorative purposes only.   
For the paper twist stem:  Untwist and "wrap" around the area where the hanger would be.   Glue in place.  I used Bearly Art Craft glue.  Hold in place until the glue dries a bit. 

The eyes are: 1/2 of a small styrofoam ball.  Just cut the ball in half and do a little rolling and molding to get them shaped as you'd like.  Wrap in crepe paper, glue and ink around the edges.  I chose hot glue to hold the eyes in place.  

The nose is a bead from my stash.  I made sure the hole was on the side and because of the solid  color of the bead, it is barely visible.  

The mouth is a piece of Paper Yarn that I made using some crepe paper and a drop spindle to "spin" the yarn and then dyed with ink.  I added some "stitching" lines after the "yarn" was glued in place with a thin line of hot glue.  

The green ornament is made the same way — halves glued together and lots of inking. 

Greenie

I did add some brown/grey moss to the neck of the ornament for a little more texture and interest.  The bugging out eyes are definitely fun and while I didn't ink around the edges, you definitely could if desired.  

Lastly for this post, I have used the Round Candy Box also from Simply Crafty SVGs and you can find it here.  I did alter the panel on the box and it was really easy to do so in SCAL 6 (you don't have to have the PRO version to do that either).  Ink the pieces of the box before assembly.  I added a strip of paper yard that I'd dyed black using ink and then filling in some areas with a black alcohol marker (Spectrum Noir).  The facial features are from a collection I found at Creative Fabrica.  You'll find it here but you'll need an all access subscription to get the best deal on this and thousands of other files you'll find you can't live without!  :)  Enabler Alert!

Frankie1
Lift the lid for more: 

Frankie2

I used permanent vinyl.  I did make an error when matting the white vinyl pieces, but decided not to mess with it and recut before layering and applying the vinyl — I kind of like the way it looks not being lined up perfectly.   I placed the eyes  of the facial details under the stitched paper yarn and the mouth on the box base – it's hidden until you open the box.  It was fun and something I've not seen done in a long while.  
Here's a quick video:  https://youtube.com/shorts/P8SxoSBgkEw?si=NbXJUyFqQePtQhLd

More coming soon….  Hoping you're enjoying some creative time!  Nurture your soul for a while today!

Halloween 2025

I got started early this year.  The inspiration for this make came from the Summer 2025 edition of Country Sampler.  Finding globes at the thrift store or yard sales around here is difficult to say the least — so remembering that I already had a globe file from a few years ago, decided to try to recreate the project, adding my own twist, using paper.  I think it turned out quite nicely!  And, yes, the globe can turn if you don't glue the hat to the top of the globe.  

IMG_1294

Files I used to create this:
Globe:  https://bribos.nl/product/108-globe/
Hat:  https://www.simplycraftysvgs.com/shop/holidays/halloween/smiling-jack-o-lantern/
Face:  https://www.creativefabrica.com/product/cute-pumpkin-faces-jack-o-lantern-faces/

AC cardstock (12 x 12)
Vinyl from stash
Heavy body black paint, 1 inch foam brush
embellishments from stash (cheese cloth, mini rosette, purple web, ribbon

SCAL 6 Pro to mat and Skycut C24 to cut paper and vinyl
eBrush, Spectrum Noir markers
Hot glue gun
Bearly Art Craft Glue
Straw