SVGs

more paper fun

One thing I really appreciate about the SCAL software is that ability to resize things with a few clicks of the mouse. I can round corners, add or delete nodes. Play with fonts. Change colors and more. Designing is so much fun and rewarding!

I’ve been eyeing a card on Pinterest for a while, but my budget for purchasing dies and files is on hold for a few weeks. This was an idea that I really needed to get made — so opening SCAL was the first step. All the pieces with the exception of the “fish” were created in SCAL. The fish were a free download from freepik.com. More about them in a minute.

The original card I saw was a slider, but I decided I wanted a box card. Yes, I saw Julie Ebersole’s version of the card, but wanted to do something just a little different, so this is my version.

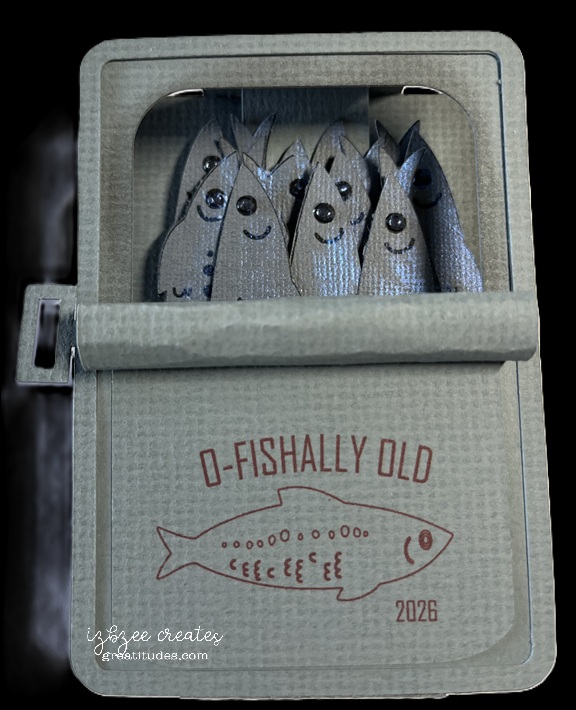
I traced the jpg version of the file in the software. Once the trace was completed, some of the elements were deleted and those remaining were set to print only. The outline was set to cut. Once the fish were cut, adding a little dimension with some Solar Paste and Nuvo Crystal Drops was all that needed to be done with fish. They were installed on a single insert with some foam tape between layers.

The rolled back top and key were a fun addition. Of course the “label” could be any design your want… I did like this sentiment and there’s plenty of room on the back to add a personalization.

The card folds nearly flat to place in a boxy envelope. It would cost more to mail, but this is a perfect card to hand deliver to a special recipient.

card frenzy!

It’s been a busy couple of weeks. June’s cards are nearly finished. The monthly stack (20) of cards went out in the mail last Friday along with those birthday cards happening in the first week of June (sorry, we have to wait on those to be delivered before I share).

The monthly stack is a hybrid card – digital images from Southern Creek Designs on Etsy (Postmarked) combining the pen (from the Greetery) and the hello (W Plus 9) dies used to add a little more interest and dimension. I’ve enjoyed putting these together. The digital collection was perfect for this one.

NOT A CARD! Memorial Day has come and gone, but we added a couple of new pieces to our home decor. Both will carry over for the 4th of July.

The heart is based on a felt ornament that came across my feed in both FB and on IG. Easy to replicate and add my own touch using SCAL and cutting the pieces on the Skycut. The poppy is from Abbi Kirsten. The hearts and stars were from the SCAL library. The ribbons are leftovers from a project we did a couple of years ago. Glad I held on to them.

Here’s a close up of the heart:

The second piece created used some files from Simply Crafty SVGs as shared in this post: https://greatitudes.com/2026/05/21/a-fun-idea/

One last card for this post: Sympathy cards are the most difficult for me to make, especially when there is a closeness to the family and their loss. This card was one that had a life of it’s own. We tried several things, but nothing seemed to work until I had a dream and saw what needed to be the focal piece in the metal frame we were adding to the card. The wax seal was a leftover from another project. It fit perfectly in the frame and was just what the card needed. The feedback was more than anticipated…

This card was made with things from my stash — all of the major elements are retired. You could, of course use other elements to achieve the same look and feel.

I guess that’s it for right now, just have to wait for a few more things to be delivered before posting… so a couple more posts coming up in the next couple of weeks.

Hoping your week is a creative one and your heart is nurtured along the way with good things and many memorable moments. ENJOY!

A fun idea

I have to admit, this wasn’t my first vision of this project, but I think this one turned out pretty good. Using the Halloween Books and Square Birthday Candle Box files from Simply Crafty SVGs – this decor piece was easy to put together and finish in a matter or a few hours after cutting. I think the cutting took longer since I was having issues with a blade and a new mat. They didn’t like each other, but that story is for another time.

The firecrackers/candles were easy to do. I did start by modifying the file and resized the main file pieces by 50%. The front panel is a combination of rectangles created using the SCAL software. All but the star is inked. Following the directions for assembly in the file, these are very easy to put together. To adjust for the other two, lengthening the box file (no changes in the width) and bottom pieces is pretty easy. There’s about an additional inch added to the middle cracker and another 1/4 inch added to the tallest. You will have to adapt the upper flap as it is too long to fit. Add another score line where the new fold should be. You can certainly glue this together after inserting the wick which is a piece of jute wrapping.

The books are cut using the file as is. I created another spine piece for each of the books — using the shadow layer feature in SCAL. Easy to do, just make sure you use the blackout box and the shadow is 0.00 – so it’s exactly the same size. There are other ways to do it, but this is just easy as well. Choose the words and font/s you want to use and create them in the software — leaving a small space at each end of the panel. Using some small rectangles or flourishes, place those to finish the spine as desired. The book paper panels are scored using a scoreboard and bone folder every 1/8 inch and inked.

Assembly videos can be found on Sandy’s YouTube channel.
Square Birthday Candles
Halloween Books

For this project you’ll need:
12 x 12 cardstock (red, white blue, off white)
gold vinyl (permanent)
glue
jute
ink (red, lt brown, black, dk blue, lt grey)
score board, bone folder
closure (optional)

Hoping you’ll have some fun doing some of your favorite creative hobbies. Enjoy the time and nurture your heart as well.

Textures

The challenge for the week was to create something with “texture.” There are so many ideas and my cupboards and drawers are full of some wonderful options.

For this tag, I chose to use some oldies but goodies from my stash – sadly, many things are no longer available.

The tag shape was created using two shapes from the SCAL 6 Library and joining them together with the Union command in SCAL 6. Some X’s were added for a little interest on the left side – and were cut not scored during the cutting process by the Skycut. Applied the border embossing folder to the top edge of the tag base. Ink the edges with the distress ink. Add the eyelet.

Cut and emboss the patterned paper piece with a folder, scruff up the edges a bit, ink the edges and glue to the base. Add ribbon and thread and secure in place.

Cut and crimp the strip, ink the edges and glue in place

Cut the backing piece for the frame, stamp and heat emboss the sentiment. Ink the piece leaving the center uninked. Secure in the frame and using brads, secure the frame to the tag base. If desired a backing can be added to the base to hide the brad prongs

Patterned paper – an old 6 x 6 pad (retired long ago)
ivory cardstock
Fiskar crimping tool
border embossing folder – Anna Griffin (Poppy, retired)
Embossing folder – Fun Stampers Journey (retired)
heart shaped eyelet – Eyelets Etc. (retired)
ribbons (stash)
thread (stash)
heat embossing powder -rose
embossing ink – Versa Mark
metal frame – Stampin’ Up! (retired)
hugs stamp – Honey Bee Stamps (Pickup Lines)
distress ink – Ranger (Old Paper)


Hoping your creative time has been productive this week. Thanks for stopping by.

Tower Double Pinwheel card

This was a fun one to create. I basically followed the directions from Crystal Best’s YouTube video for this one. I chose some junk journal images I found on Creative Fabrica (loved the dimension on the images) and a couple of other files also from CF (lined vintage background images and Pastel Ombre images.)*

The finished tower is actually quite sturdy and there are quite a few options on how you use your images of choice on each of the “wings.”

I did turn the smaller layers sideways in my cutting file — my bad, but that’s an easy fix for future makes. This design would also make for a fun mini album or mini journal in a larger album. I made this one in the A2 size (4.25 x 5.50 inches). However, Crystal also has directions for a 5 x 7 design in the same video as shared above which would also be perfect for using some cherished photographs or other small artwork.

A couple of things I really like about the SCAL 6 software (basic or pro) is the option to fill shapes with images using the Pattern command or using a mask option in the software to fussy cut an image. And the Skycut C24 cuts spot on when using the Print 2 Cut option in the software when the calibration has been set. Even better is that regardless of updates to the software, you don’t need to recalibrate the camera/laser. The cutter is a fabulous machine. If the pricing is out of your budget, Skycut is also making a few other machines under different brands (SOLO by Starcraft, Juliet and Romeo by Siser). I’ve heard great things about them all and they can also use the SCAL software as well as the proprietary software sold with the machine.

*I have used affiliate links for all of the Creative Fabrica files I used in this project. If you choose to purchase the files, I will receive a small amount from the sale. Additional costs are not added to your purchase to cover that. AND a huge Thanks for using the links!

Final day of 3 the Spring Tags Reveal

Day3: This was a fun tag to create for the final day of the reveal. All of the foundational pieces were designed in SCAL 6. The digital paper used for the awning of the cart is from NitWit Collection’s Porch Swing Fat Quarter Collection. Print then Cut was so easy and I really like the look. I doubled up that piece and the under piece was colored with some brush watercolor markers in a slightly darker colored pink.

The cart is a pretty fun process and the front wheel is on a mini spinner and that adds a little surprise after using some watercolor maker brushes to add some color and depth. The digital flower strip is from an element in the ephemera collection in Carta Bella’s Spring Market files. I resized the image a bit to fit in the cart. I added some baby’s breath as well. The hot glue almost looks like water in the wells that hold the stems.

Foam tape
Bearly Art Glue
Mini Spinner
Baby’s breath

All but the floral strip were cut using the SCAL 6 software and Skycut C24.

Enjoy a creative day! Take care and have some fun!

3 Spring Tags – it’s a reveal!

For the last 5 or so years, one of the Facebook groups I belong to has been celebrating the arrival of Spring with a Spring Tag Reveal. This year is no exception — in years past, we’ve done anywhere from 3 to 5 tags… this year, we’re doing 3.

It’s looking like Shabby Chic will be my theme for this season’s tags. I used a couple of digital collections in my stash and some inspiration from Pinterest. I did purchase a file for today’s tag from Etsy and resized 2 of the pieces to form my tag.

DAY1: Layered looks are always fun! Digital paper selections are from the Porch Swing Fat Quarter Collection from Nit Wit Collections provided the patterns for this layered tag. The edges of each layer is inked with Oatmeal Cookie from FSJ (retired) and some foam tape was used to pop the top layer of the tag up. Bearly Art glue was used to adhere the bottom two layers of this tag together. Cotton crochet thread was used for the hanger.


Looking forward to sharing the next two tags over the next two days. Hoping you’re carving out some creative time on a regular basis. Have some fun!

a Spring decor idea

While this project isn’t quite finished, it’s pretty close to being there. Pinterest inspired. I used several files for this one. The tulips used are from Sammydenny.de. The file is a pdf file and needs some work to create a cutting file. The lines on the pdf are really light in the printout I made. The leaves are from the Parrot Tulip file from Maison Gregoria (on Creative Fabrica) and the rabbit silhouette is from Creative Fabrica.

The sign is a file I created using Blender and Pepakura – I cut the hello in paper and vinyl. The vinyl is an overlay on white paper and gives it a little more stability. Super simple and all pieces are cut using the SCAL 6 software and Skycut C24.

I used some wrapped wire as a wreath form.

Ultimately, I want to place this in a shadowbox to call this project complete.

***I have used some affiliate links in this post. Please note that using the links will not cost you anything extra if you choose to purchase any of the files from Creative Fabrica.

I did a thing….

I saw the spinning cube design on Instagram – no svg for it, just some measurements and a short video to do the construction (@gayatriscrafts) and I made one. This is my test version to see if I could get that cube to spin! AND…. I did it! I’m really happy that it worked and I think I can tweak the svg file I created a bit more to make this thing a little sturdier (and use a smaller stack of magnets or a stronger one).

This is a show stopper in that the cube is connected to the base by a bit of clear thread (nylon – like fishing line), but not to the arm. The magnets in the arm and cube have enough strength to keep the cube suspended and allow it to spin. I think the grandkids will like this one a lot!

*I did create an SVG file to cut this one using SCAL — it’s for my personal use only and will not be shared or sold.

I do need to make a few tweaks to my file before I cut another however as the end of the arm needs a little more finishing. I used foam core instead of cardboard as fill for the post and arm. It is sturdy, but the post needs another brace to keep it from leaning towards the cube – if you’re a bit of a perfectionist or have a bit of OCD. We were able to get the cube to spin and stay in place overnight without falling – but the post was leaning in a few degrees toward the cube more than it was when we started our “experiment” with the cube just hanging there.

It’s a fun project and I look forward to making another soon.

where’s the cuckoo?

It’s been a crazy couple of weeks around our place… thus the cuckoo title. Me thinks the cuckoo flew the coop! Oh well, on with the make. I’ve gotten out of the habit of late taking pictures of the progress, so we’ll just have a couple.

I did add a sound module from Invite By Voice to this make from Emma Parrish – you can find her shop on Etsy — and it’s really kind of fun to listen to when you open the box and look through the flaps and pockets. I didn’t follow her design exactly, but pretty closely. The audio was a find on Pixabay… yep, they have audio files and video files too!

TIP: You do need to pre-print the backs of each sheet before cutting. I did have to do a little redraw on a few shapes for a clean cut in SCAL — the jpgs just didn’t trace well – and that is a drawback to SCAL on some things especially if there are light lines on the image. I chose not to do the preprint on the back, but did print a separate sheet and cut the shapes. It worked well and gave my box a little more stability in the base and on the side walls.

That birdhouse in the center of the base does stand on it’s own. I changed out the flowers in the kit and used a flower punch. You do need at least 2 layers on the flower for extra strength at the base of the post. While you can’t see it in the picture, there is a Nuvo drop center in the flower for a little extra detail. Each of the images in the pockets are provided in the kit. And there were a few extras left over.

Even on selecting BEST for printing, the colors are a bit muted and vintage looking. I like that. The design is well thought out. She has lots of printable designs in her shop.

I wonder if the cuckoo will find it’s way home again?

where’s the cuckoo?

Additional materials:
AC and Encore cardstock (textured white)
Printer
Bearly Art glue – fine tip applicator
bone folder
foam tape
Sound module (light activated) from Invite By Voice
mp3 audio file (freebie from Pixabay)
Distress Ink (Old Paper)
blending tool

Hoping you’ve got some creative time inked in on your agenda for the coming week. Have some fun and nurture your heart along the way.